This guide provides information on how to add and remove contacts from a sequence.
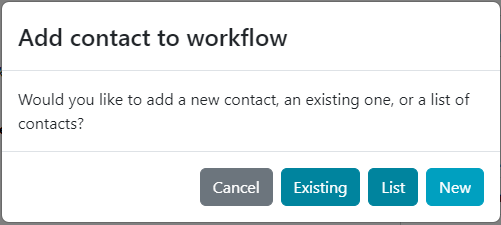
There are four ways to add contacts to your sequence, you can add an existing contact, a list of contacts or you can create and add a contact at the moment of adding them to the sequence.The last option is to add a single contact directly from the contact card.
Equal to the first three options for adding contacts to a sequence in LeadJabber, is that you need to use the Manager for the sequence you wish to add contacts to.
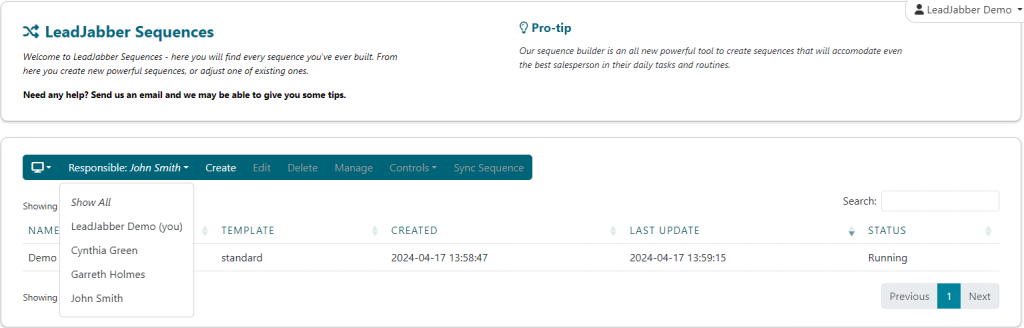
You’ll find this by going to “Sequences” then “All sequences” to get an overview of all your users sequences (if you are an admin and will work on another user’s account, you can choose that user by selecting them in the “Responsible” option above the list of sequences).
Once you have the list of sequences, to get into the Manager for the sequence you wish to add contacts to, you can either mark the sequence and then click the “Manage” button above the list, or you can simply double-click the name of the sequence.

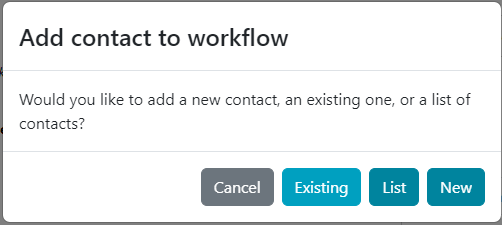
Once you are in the Manager view, you can add contacts to the sequence by clicking the “Add contacts” symbol in the top-right corner of the stage you wish to add contacts to (typically it will be the first stage of the sequence unless you need to add someone to another stage manually, for example if they have been removed from the Sequence by mistake and you want to put them back in the flow).

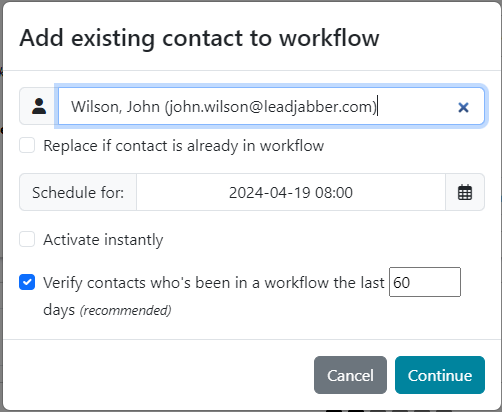
If you want to add an existing contact to your Sequence, when you click the “Add contacts” symbol, choose “Existing” in the prompt window that opens.
Here you can search for the contact you want to add by name or email address, and select it by clicking the correct contact in the results it finds.
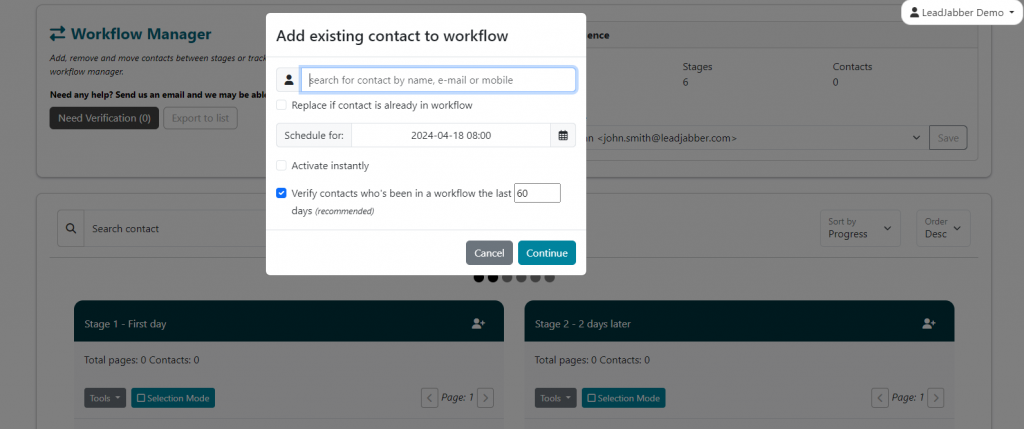
You can choose to replace the contact if it’s already in the sequence by checking the option below the field where you choose the contact. This will essentially take the contact out and put it back in at the selected stage.

Next you have the choice of either schedule when the contact will enter the stage (when the actions in the stage will be executed, by default it’s the time set for the stage in the Sequence Builder) by clicking on the time and date field and choosing a specific date, or you can choose to add the contact and execute the actions right away by checking the “Activate instantly” option below the time and date field.
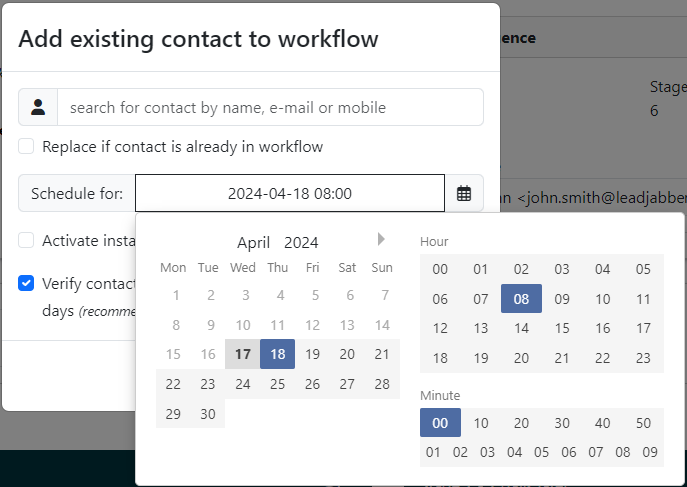
The last option, “Verify contacts who’s been in a workflow the last X days (recommended)“, is to check if the contact you’re adding has been in another of your (or other users on your account) sequences in the number of days selected. This is an extra security measure in case you might not want to send to someone you or someone else in your account have already contacted in that time period.

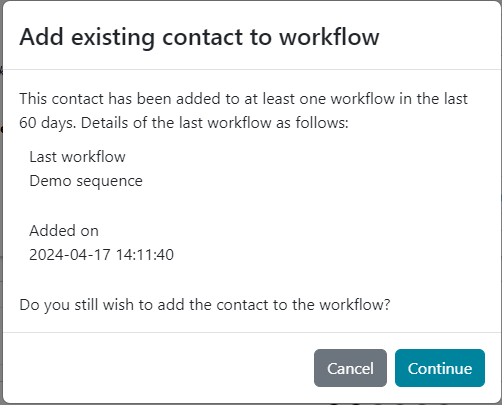
If the contact has been in a workflow within the time set, it will give you information about this and ask if you want to add the contact anyway.
When you have chosen the contact and settings you want, you can click “Continue” to add the contact to the sequence and stage.*
*If you have checked the “Use personalization options” for the email template in the stage when you created the sequence, you will get an opportunity to edit the email for that specific contact after you click “Continue”. Edit the email if you want and choose “Save Changes and Continue”, or if you don’t need to edit, just click “Continue Without Changes”.
If you want to add a contact list to your Sequence, when you click the “Add contacts” symbol, choose “List” in the prompt window that opens.

Here you can search for the contact list (from “Contacts & Lists” – “Contact lists”) you want to add and select it by clicking the correct list name in the results it finds.
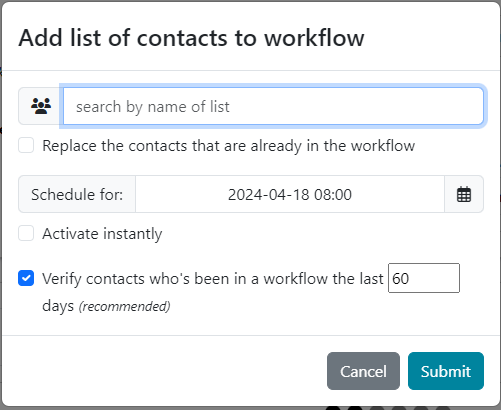
You can choose to replace the contacts from the list (if any) if they are already in the sequence by checking the option below the field where you choose the list. This will essentially take the contacts out and put them back in at the selected stage.
Next you have the choice of either schedule when the contacts in the list will enter the stage (when the actions in the stage will be executed, by default it’s the time set for the stage in the Sequence Builder) by clicking on the time and date field and choosing a specific date, or you can choose to add the contacts and execute the actions right away by checking the “Activate instantly” option below the time and date field.
The last option, “Verify contacts who’s been in a workflow the last X days (recommended)“, is to check if the contact you’re adding has been in another of your (or other users on your account) sequences in the number of days selected. This is an extra security measure in case you might not want to send to someone you or someone else in your account have already contacted in that time period.*
When you have chosen the contact and settings you want, you can click “Continue” to add the contact to the sequence and stage.
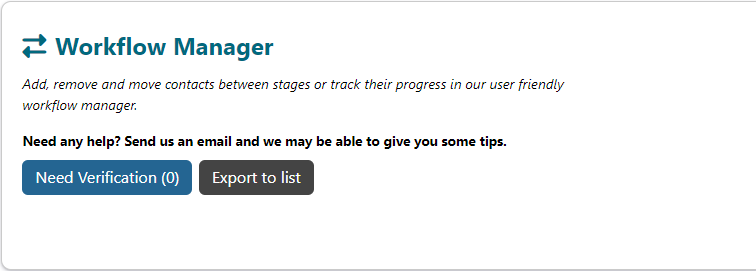
*If any of the contacts in the list has been in a workflow within the time set, the number of contacts this applies will appear in the “Need Verification” button in the top left section of the manager. If there are any, click the button to see which contacts this applies to, and choose if you want to add all of them anyway, drop all of them or choose individually for each contact.
If you have contact information for a single contact outside LeadJabber and you want to add that contact to LeadJabber and directly into your Sequence, when you click the “Add contacts” symbol, choose “New” in the prompt window that opens.
In the next window that opens, fill out the contact information that you have and click “Save” to add the contact to LeadJabber.

The following window gives you the same options as when you add an existing contact.
You have the choice of either schedule when the contact will enter the stage (when the actions in the stage will be executed, by default it’s the time set for the stage in the Sequence Builder) by clicking on the time and date field and choosing a specific date, or you can choose to add the contact and execute the actions right away by checking the “Activate instantly” option below the time and date field.
The last option, “Verify contacts who’s been in a workflow the last X days (recommended)“, is to check if the contact you’re adding has been in another of your (or other users on your account) sequences in the number of days selected. This is an extra security measure in case you might not want to send to someone you or someone else in your account have already contacted in that time period. This option will not really apply here, since it’s a brand new contact, so it’s not really necessary to have this option checked.
When you have chosen the settings you want, you can click “Continue” to add the contact to the sequence and stage.*
*If you have checked the “Use personalization options” for the email template in the stage when you created the sequence, you will get an opportunity to edit the email for that specific contact after you click “Continue”. Edit the email if you want and choose “Save Changes and Continue”, or if you don’t need to edit, just click “Continue Without Changes”.
You can also add a contact to a sequence by going to “Contacts & Lists” – “All contacts”, then search for the contact and click the name of the contact to get to the contact card.
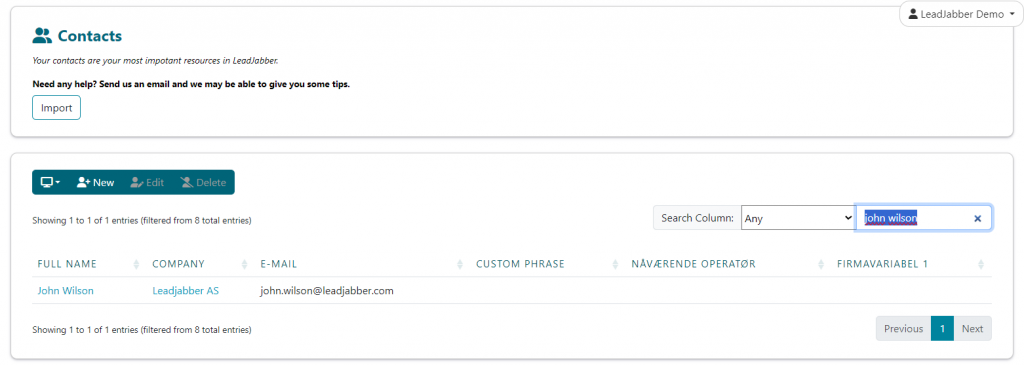
Alternatively, if the contact has a company, you can go to “Contacts & Lists” – “All companies”, search for the contacts company name and double click the correct company name to get a list of contact associated with that company, then click on the name of the contact you want to add to a sequence to open their contact card.
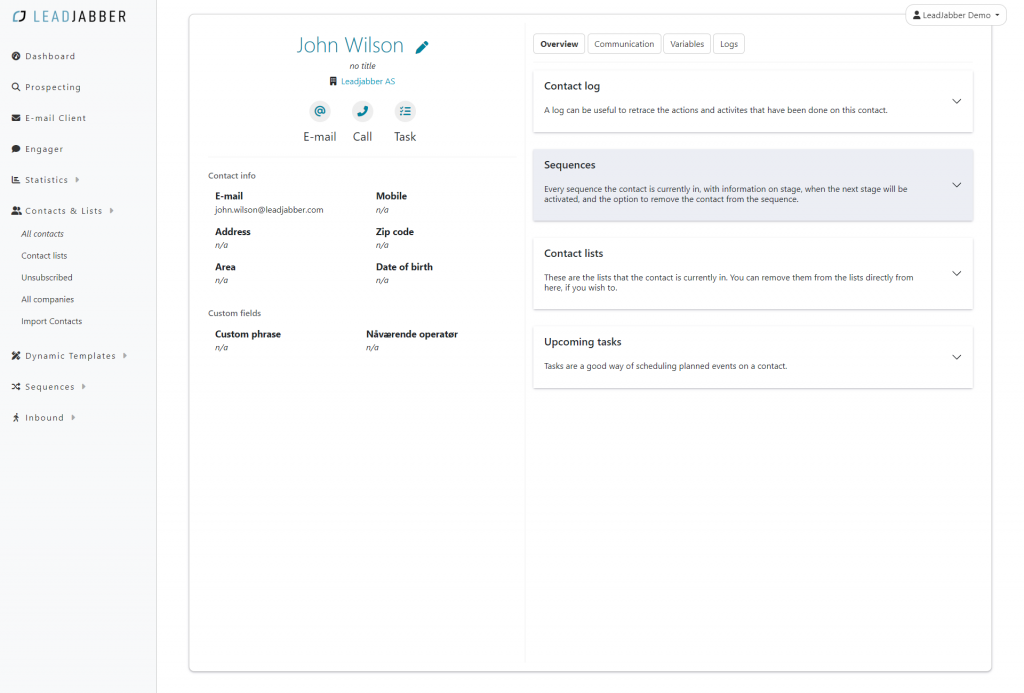
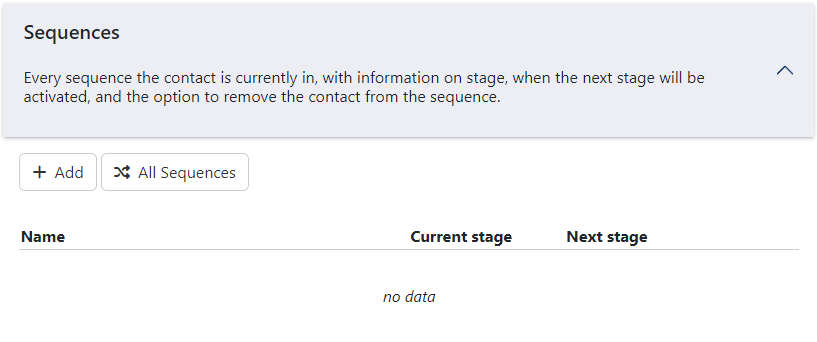
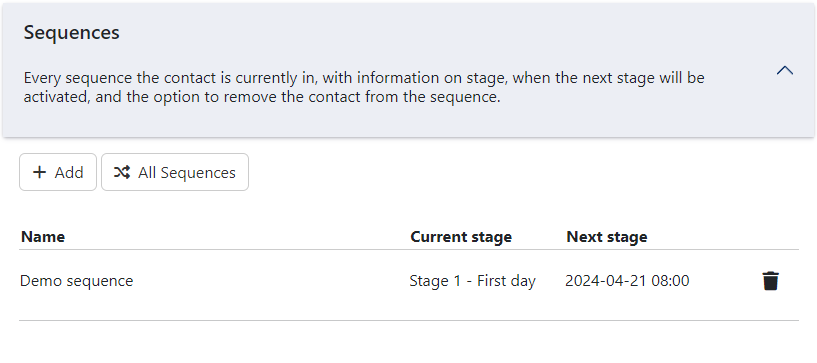
Once you are in the contact card of the contact you wish to add to a sequence, click the “Sequences” section on the right hand side, then click “+ Add” above the list of sequences the contact is currently in.
The following window gives you many of the same options as when you add an existing contact in the Manager, but has a couple of differences.
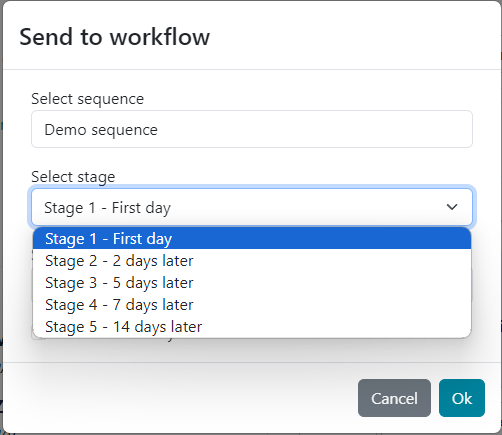
First you have to select the correct sequence by searching the name of the sequence and selecting it by clicking on the correct result, then select which stage in the sequence you wish to add the contact to (typically the first one).
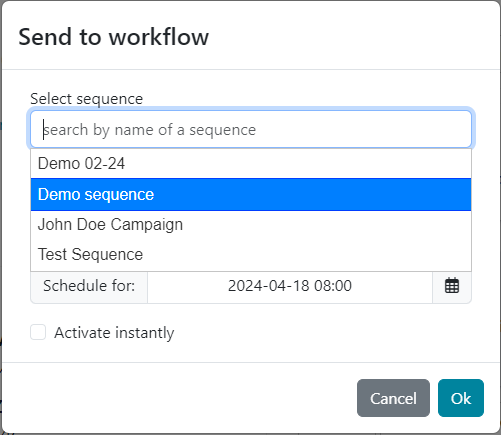
Next you have the choice of either schedule when the contact will enter the stage (when the actions in the stage will be executed, by default it’s the time set for the stage in the Sequence Builder) by clicking on the time and date field and choosing a specific date, or you can choose to add the contact and execute the actions right away by checking the “Activate instantly” option below the time and date field.
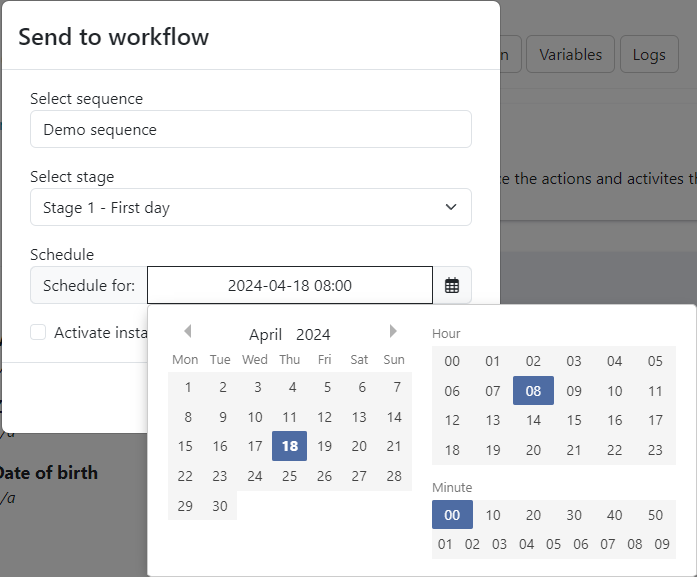
When you have chosen the settings you want, you can click “Ok” to add the contact to the sequence and stage.*
*Note that using this way of adding a contact to a sequence does not bring up the personalization options of the email in the stage even if that setting is on in the Sequence Builder. If you have this setting and you wish to edit the email text for this contact when adding to the sequence, please use the Manager for existing contact as described further up in this guide.
Typically a contact is removed automatically when they respond in outreach campaigns if the forwarding of your sender email is set up correctly and you have this option checked in the Sequence Builder.
But if you want to remove a contact manually for any reason, for example if you have corresponded with the contact on your phone and don’t want them to receive follow up emails, you can do this in two different ways; either via the contact card of the contact, or using the Manager for the sequence.
You can remove the contact via the contact card by going to “Contacts & Lists” – “All contacts”, then search for the contact and click the name of the contact to get to the contact card.
Alternatively, if the contact has a company, you can go to “Contacts & Lists” – “All companies”, search for the contacts company name and double click the correct company name to get a list of contact associated with that company, then click on the name of the contact you want to add to a sequence to open their contact card.
Once you are in the contact card of the contact you wish to remove from a sequence, click the “Sequences” section on the right hand side, then click “Trashcan” icon for the sequence you wish to remove the contact from in the list of sequences the contact is currently in.

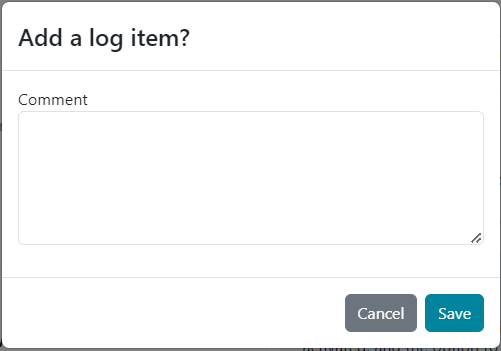
You will then be prompted if you are sure you wish to remove the contact from the sequence, and after you remove it you get the option to add a log item for the action, for example if you wish to comment the reason for removing the contact.
If you want to remove a contact using the Manager, go to the Manager for the sequence you wish to remove the contact from.
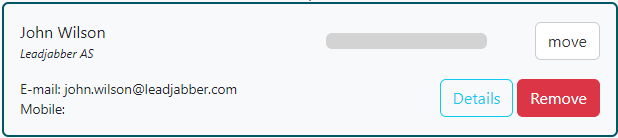
Once there, you can search for the contact in the search field above the stages by entering their email address and then the Enter/Return key. This will just show the contact you search for in the stage it is currently in.

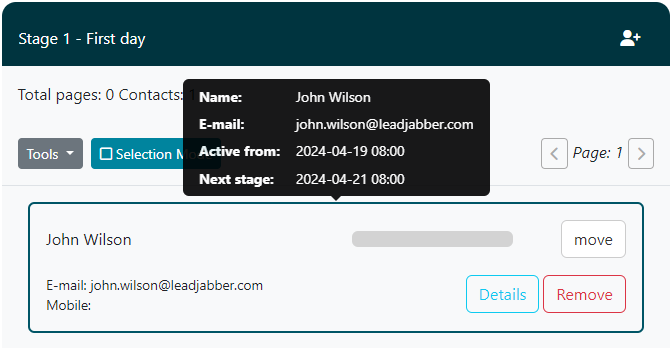
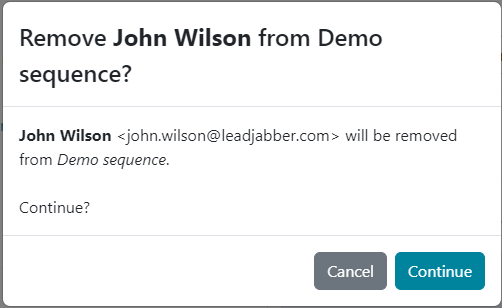
To remove the contact, click the contact to open more information, then click “Remove”. You will then be prompted if you are sure you wish to remove the contact from the sequence, and after you remove it you get the option to add a log item for the action, for example if you wish to comment the reason for removing the contact.

The “Time in stage” setting for the stage in the sequence builder, is from the time the contacts “Active from” is in the sequence. For example, if time in stage is set to 7 days and you schedule a contact or list of contacts in the manager for the tomorrow, then the contact will go to the next stage 7 days after tomorrow. You can see the “Active from” and “Next stage” (when the contact will go to the next stage if it is not removed automatically or manually) by clicking an individual contact in the Manager and choosing “Details”, or you can go to the contact card and see when it is scheduled for the next stage under “Sequences”.