This guide provides information on how to import contacts to LeadJabber.
LeadJabber is built as automation software with a CRM as a base for the contacts. Each contact has fields for first name, last name, email-adress, phone number, company name etc.
There are different ways of getting contacts into LeadJabber. For example you can add them manually one by one as new contacts from the “Contacts & Lists” area or from a reply in the Engager, you can get them automatically through contact forms with web hooks on a webpage, or, as we will focus on here, you can add them in bulk with an Excel or csv file.
To import contacts from an Excel or csv file to LeadJabber, you can go to “Contacts & Lists” and then “Import Contacts”. From there you can import and/or update contacts from .csv, .xls or .xlsx files. Read important information and descriptions of how the files should be at the last section of this page.
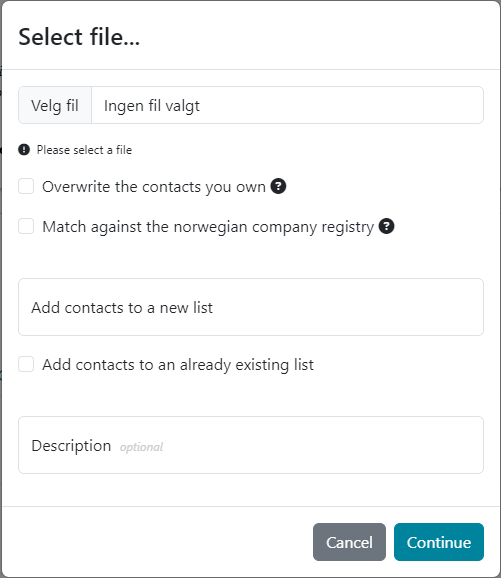
To import a file with contacts, choose “Select file…” at the top menu of the page. This will open the import settings. Start with choosing a file in .csv, .xls or .xlsx format.

The next option is if you want to overwrite contacts that already exist with the same email address in your contacts. This will overwrite everything of the existing contact, including log items and other variables, so this is checked off by default. An example of when overwriting can come in handy is if you have something wrong with many contacts, for example the company names are wrong, their names is in all caps or similar. Then you can import and overwrite the contacts with the correct information.
The next checkbox is whether you want to match company name and/or company number against the open data for Norwegian company information (Brønnøysund-registrene). This will add other company information if it matches a company name during import, for example if you just have the company name it will add company number and segmentation information. If you add contacts and/or companies from outside of Norway, make sure this option is unchecked!
The next setting is if you want to make a new contact list with the imported contacts, or if you want to add them to an already existing list. To create a new contact list, write a name for the list. If you want to add the contacts to an existing list, check the option, search for the name of the list and choose it.
Lastly in this window, you can give a description of the imported contacts. This can come in handy when searching for contacts or to leave information about the import for other users.
Click “Continue” to proceed.
Next up is matching the columns from the file with the contact fields in LeadJabber.
The registered columns from the file are on the left side, and you choose the corresponding contact field in LeadJabber on the right. LeadJabber will automatically guess the fields by the column names, but make sure it is correct before proceeding to the next part, which is a preview of the contacts to be imported. Click “Preview” to proceed.
In the next view you can see examples of the contact information from the file and how that information will translate to the contact fields in LeadJabber. If everything looks good, click “Initiate import” to start the import process.
You will be returned to the “Import Contacts” page, and you will see the progress of the import. It will say “done” under status when it’s finished, and you can see detailed information about the import by selecting the import and clicking “More information” in the top menu.
There are some things to consider for successfully importing contacts from a file:
Another important thing to consider is that you should only import one file at a time, to avoid overwriting or “double” contacts.